Static Web Hosting with a Custom Domain in AWS
Static website hosting can be easily configured using Amazon S3, AWS CloudFront and Amazon Route53. Here when a user requests the website it first directs to Route53 and then the request is passed to the CloudFront. Through CloudFront, only the request is redirected to the S3 endpoint. This is a secure method rather than giving direct public connection to the S3 bucket.
Amazon S3
Amazon S3 is a simple storage service provided by AWS which can be considered as a fast, highly scalable, reliable, inexpensive data storage infrastructure. Amazon S3 is used to store static files needed for the website.
AWS CloudFront
AWS Cloudfront is a content delivery network(CDN) that securely delivers data all across the globe.
Amazon Route53
Amazon Route53 is a highly available and scalable domain name service(DNS). Route 53 has the following record sets.
- A record: To point a domain to an IPv4 IP address
- AAAA record: To point a domain to an IPv6 IP address
- CNAME record: To point a hostname to another hostname
- Alias record sets: An alias record contains a pointer to an AWS specific resource such as Elastic Load Balancer, CloudFront distribution, Amazon S3 bucket, Elastic Beanstalk environment.
Using the above three services, let’s see how we can host a static website in AWS.
- Create a bucket in S3
- Enable static website hosting in s3
- Add the content to the s3 bucket
- Add bucket policy
- Create a hosted zone in Route53
- Update the name server records in the domain name with the Route 53 ns records
- Create a distribution in Cloudfront to enable connection from Cloudfront to S3
- Create a trusted certificate
- Create a record set in Route53 to enable connection from Route53 to CloudFront
1. Create a bucket in s3
First, go to the AWS management console and select S3 under storage services. Select create bucket to create a new bucket.
In the bucket creation window give your custom domain as the bucket name and select the region for the bucket. Then select Next.
You can enable server access logging and versioning, but it is not required for static web hosting. So select Next in order to go to the next configuration. Here opt-out the tick “Block all public access” as we are going to do hosting using this bucket. Once you opt-out AWS will prompt a warning message, ignore it for now.
2. Enable static website hosting in S3
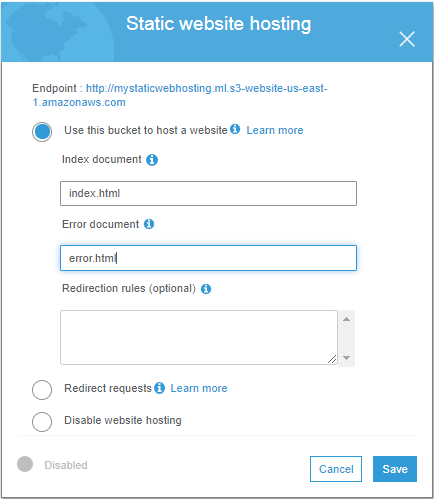
Go to the created bucket and select the Properties tab. Then select static website hosting property.
Select Use this bucket to host a website option and add the file name of the index document and the error document. Here any other redirections also can be given through redirection rules. Click Save.
3. Add content to S3 bucket.
Go to the Overview tab and select the upload button to upload the index file and the error file. Upload files using default configurations.
4. Add bucket policy
Now the bucket has full public access. Since we are hosting a static website we are now going to edit the bucket policy for the S3 bucket with read only public access. For that go to the Permissions tab and select the Bucket Policy button.
Add the following as the bucket policy. Make sure to replace “staticwebhosting2332” with your bucket name.
Then click Save.
5. Create a hosted zone in route 53
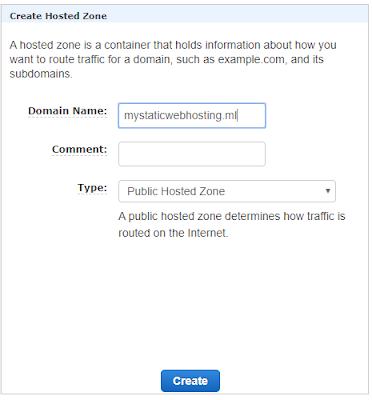
In order to route a custom domain we need to configure Route53 with the custom domain. So first let’s create a hosted zone in Route 53.
Go to Route53 from AWS Management console and go to hosted zones. Then select Create Hosted Zone. Enter the custom domain under Domain Name section and click Create.
6. Update the name server records in the domain name with the Route 53 ns records
After creating the hosted zone you will be redirected to a page where it contains name server records. Copy the ns records from route 53 and update the custom domain ns records with them.
7. Create a distribution in Cloudfront to enable connection from CloudFront to S3
Until now we have successfully created the bucket with all the policies. Then we need to create a connection to S3 with CloudFront. For that first we need to create a distribution in CloudFront.
Select CloudFront from AWS management console. Select Create Distribution.
Then select Get Started. For the origin domain name under Origin Settings get the S3 endpoint url without http://. For example : mystaticwebhosting.ml.s3-website-us-east-1.amazonaws.com
Then select Redirect to HTTP to HTTPS option in Viewer Protocol Policy under Default Cache Behavior Settings.
Then add the custom domain name to Alternate Domain Names(Cnames) under Distributed Settings.
8. Create a trusted certificate
In order to create an alternate domain name(cname) it is mandatory to create a custom trusted certificate. If you do not have any prior certificates “custom SSL Certificate” option will be disabled. But in order to create the certificate select Request or Import a Certificate with ACM under custom SSL Certificate and in the configuration add the custom domain name and select Next.
Select DNS validation option. Click Next. Then select Review. Select Confirm and request. Then select Continue. After that you can view the certificate which is in the pending state. Select the drop down of the certificate under Domain and click “Create record in Route53” and create the record set.
Once the status becomes “Issued” the SSL certificate will enable under custom SSL certificates.
Select the certificate and click Create Distribution to create the CloudFront distribution.
9. Create a record set in Route53 to enable connection from Route53 to CloudFront
Select create record set in Route53. Do not add anything to the name field. Select A-IPV4 address as the Type, select Yes option in Alias and finally select CloudFront domain name under -CloudFront distributions- as the target. Then select Create.
Now all the configurations are properly done. Let's see if you can view the website.
When I browse with the domain my main is rendered.
And when I use https://mystaticwebhosting.ml/error , error page rendered.
Select the certificate and click Create Distribution to create the cloudfront distribution.


Comments
Post a Comment