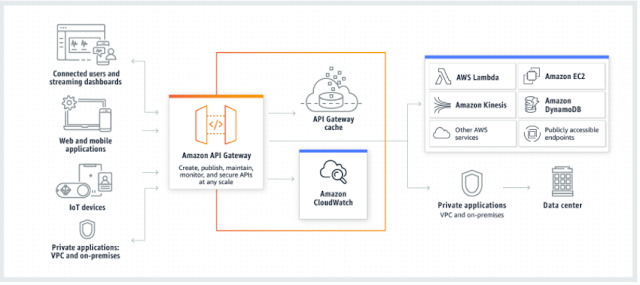
Amazon API Gateway is an AWS service for creating, publishing, maintaining, monitoring, and securing REST, HTTP, and WebSocket APIs at any scale. API developers can create APIs that access AWS or other web services, as well as data stored in the AWS Cloud

I have quoted the above definition from AWS official documentation which explains the nitty gritty of Amazon API Gateway.
In addition to REST, HTTP and WebSocket API management, API gateway provides the following benefits.
Powerful authentication mechanism such AWS IAM policies, Lambda Authorizer functions, Amazon Cognito user pools
Developer portal to publish APIs
Canary release deployments for safe roll out changes
Support for custom domain names
Integration with AWS WAF to protect APIS against common web exploits
Integration with AWS X-Ray to understand performance latencies.
More importantly, the above benefits can be obtained with a simple configuration. BUT where does API gateway configuration happen in a REST API?

API gateway accepts hundreds of thousands of concurrent API calls and acts as the “front door” for applications to access data, business logic, or workloads running on Amazon EC2, AWS Lambda etc.
You can follow this, which will guide you to set up a simple HTTP endpoint in API Gateway by utilizing AWS Lambda.
Out of the greater benefits provided by Amazon API Gateway, this article focuses on the security aspect of API Gateway.
API Gateway provides security in three domains
- Identity-based: This controls access to the API via the identity of a user. For instance, users can be granted access to an API based on an access token or IAM role. (AWS Identity and Access Management)
- Resource-based: This controls access to the API via identity-based policies and resource-based policies. This is done using IAM resource policies that are directly attached to API gateway resources.
- Network-based: This controls the access to the API via a network.
There are several security mechanisms that we can follow to secure our REST API and each of them falls under one of the above domains. Out of them, I’m going to explain the 3 major security mechanisms which can be used in a serverless framework. These mechanisms operate as identity-based security mechanisms.
- AWS IAM: Provides authentication and authorization using IAM credentials
- AWS Cognito
- AWS Lambda
In this article, I’m going to explain how we can enable security policies using IAM and Cognito in AWS Management Console.
AWS IAM
After deploying the http method, enable IAM authentication by following the below steps.
- Go to Resources in the API Gateway and select the API method you deployed (Eg: GET )
2. Select the Method Request
3. Select AWS IAM under Authorization options and click the right icon(update button) to save the change.
IAM authorization for the API endpoint can be enabled in two ways
- Grant API authorization to a group of IAM users
- Grant API authorization through API Gateway resource policies
Let’s see how authorization can be enabled in both ways, but one way would be enough when enabling authorization.
1. Grant API authorization to a group of IAM users
Initially, we should create an IAM policy that grants permission for an API user when invoking the API. For that go to the IAM service in AWS management console and select Policies from the left side panel. Select the Create Policy button in the top right corner, go to the JSON tab and add the respective API Gateway invoke permissions.
After adding the policy, review it and create the policy after giving a name for the policy.
Next we need to create an IAM user which we are going to give access to the API. For that go to Users from the left side bar and create an IAM user with Programmatic Access. After creating the user, download the credentials csv file(These credentials are needed for authorization when invoking the API). Next create a user group from User groups from the left sidebar. In the user group creation process, add the lastly created user into the group and attach the policy created with the API gateway invoke permissions.
Now the authorization configuration is completed. Let’s invoke the API from postman.
In order to configure Authorization header, select AWS Signature, as the authorization type and add the access key and secret access key of the user. (Can get them from the credentials csv file). Then we can successfully invoke the API, and get 200 successful response.
2. Grant API authorization through API Gateway resource policies
First, go to the respective API endpoint of the API Gateway and select Resource Policy from the left side bar.
Then add the resource policy to the blank space and Save it. Resource policies can be given to limit access for a given VPC, IAM user/users, IP address etc.
After that deploy the API and test it using Postman by giving the access key and secret access key of the IAM user in the authorization header.
AWS Cognito
First, a user pool needs to be created which is going to be used to authorize users. After that go to the Authorizers in API Gateway and create a new authorizer for the API, select Cognito as the authorization type.
Then select the created the cognito user pool and add Authorization to the Token Source and click Save.
Then go to the respective API endpoint, go inside the Method Request and select the cognito user pool authorizer from the Authorization drop down and save it.
Now, when the user logs in to the application a token will be generated by the cognito user pool. This token can be used to access the secured API.
Out of the multiple ways to secure your API, this article focused on secure the API using AWS IAM and AWS Cognito.


Comments
Post a Comment